We’re all guilty of relying on our WiFi for just about everything these days. From streaming our favorite shows to getting work done, having a strong connection is crucial. Here, we’ll show you how to check WiFi signal strength when you’re faced with a weak connection on Windows 11.
Windows 11 provides users with tools to check the strength of their WiFi signal. It’s super important to know how to use these tools to troubleshoot any issues and make sure you’re getting the best connection possible, whether you’re at home or out and about.
There are a few factors that can affect the WiFi signal strength on Windows 11, nevertheless, this article on Naijaknowhow explores the different ways to check WiFi signal strength on Windows 11, so you can enjoy seamless online browsing, streaming, and work. Let’s delve right in!
How to Check WIFI Signal Strength on Windows 11
Do you want to know how to check the WIFI signal strength on Windows 11? Well, it’s a piece of cake, even easier than changing your desktop background. So, let’s jump right into it! Below are some easy ways to view your WIFI signal strength, no tech skills required. Let’s get started and boost that WIFI connection!
Step 1: Check via Taskbar

Have you ever noticed that long bar at the bottom of your computer screen? That’s called the taskbar, and it’s an essential part of managing your computer’s programs and apps. It’s a convenient way to see which programs you have open and switch between them with ease. You can also access some shortcuts, like adjusting your WIFI settings, all in one place.
If you take a closer look at the right corner of the taskbar, you’ll notice some curved lines that represent your WIFI signal strength. The more lines that are filled in, the stronger your connection is. This is an excellent feature to keep an eye on if you’re having trouble with your WIFI connection or if you need to make sure you have a stable connection.
Step 2: Check via Control Panel
The Control Panel is a comprehensive utility in Windows devices that enables users to modify and access system configurations. The steps below outline the process for checking your WiFi signal strength using the Control Panel:
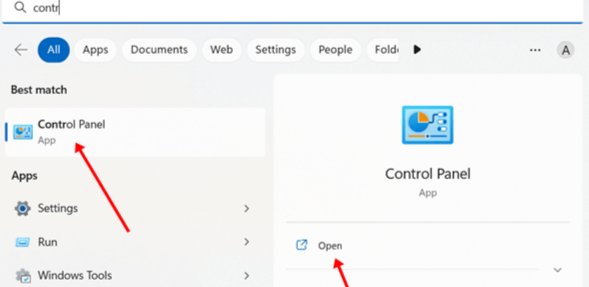
- Open the Windows menu and search for Control Panel, then click on it.

- Once the Control Panel opens, select the option for Network and Sharing Center.

- In the following window, you should be able to see the signal strength of your WIFI connection.

Step 3: Check via Windows Settings
Windows Settings allows you to customize various functions on your PC. Additionally, it provides information about the strength of your network connectivity. Below, you’re provided with the steps on how to check the wifi signal strength on Windows 11 using it.
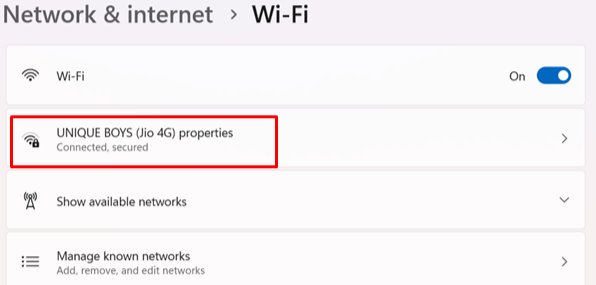
- Open the Windows menu and select “Settings“. Then click on “Network & internet“.
- Make sure that your WIFI is turned on, and click on the WIFI tab.

- You will now be able to view the signal strength of your current WIFI connection.

- To check for other available connections nearby, click on the option to view other network connections. The signal strength of these networks will also be displayed.
Step 4: Use PowerShell
To check the stability of your Wifi signal, it can be helpful to use PowerShell, a task management and automation tool. Here are the steps you can follow:
- Open the Start menu by pressing the Windows key, then search for “PowerShell” and click on it to open it.

- If prompted to confirm, click “Yes” to run PowerShell with administrator privileges.
- Type the following command into the PowerShell window:
(netsh wlan show interfaces) -Match ‘^\s+Signal’ -Replace ‘^\s+Signal\s+:\s+’,”
- Press “Enter” to run the command, and it will display the internet signal strength near your location.

Step 5: Use Command Prompt
To determine the strength of a WIFI signal, you will need to utilize the Command Prompt tool. Let’s go through the steps together.
- Open the Start menu by pressing the Windows key, then search for “Command Prompt” and right-click on it.

- Select “Run as administrator” from the context menu and click “Yes” when prompted to confirm.
- In the Command Prompt window, type the command provided below and press “Enter.”
netsh wlan show interfaces
- The signal strength should now be displayed.

Step 6: Check via Task Manager
Task Manager, like any other utility app in Windows, provides essential information about running apps and programs. Additionally, it also provides information about the strength of internet connectivity. Below, we’ll go through the steps on how to check Wifi signal strength on Windows 11 using it.
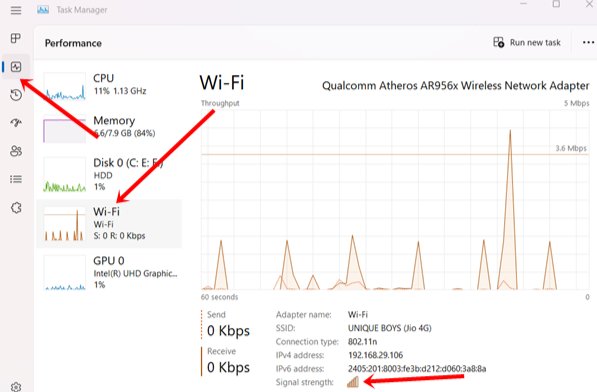
- Open the Task Manager by clicking on the Windows button and searching for it.
- Once opened, select the Performance tab.
- Click on WIFI to access detailed information about WIFI signals and other related data.

Conclusion
Understanding how to check WiFi signal strength on Windows 11 is essential for diagnosing and resolving connectivity issues, ensuring a stable and reliable internet connection. With the methods outlined in this article, users can easily monitor their WiFi signal strength and take appropriate action to improve their network performance.


