This morning, a friend told me he has the habit of abandoning his damaged or bad gadgets, he said, he’d rather replace with a brand new one than fix it. Although, this is a habit he wants to curb at all cost, and then i realised, I am a perfect opposite of who he is. How did I help him? I had to share with him the story of how i converted a 6000mAh powerbank to 16000mAh capacity, keep reading to know how I intrigued him with my little knowledge on fixing electrical gadgets.
The difference between being normal and a geek is the ability to think critical and creative, sometimes it marvels me why simple things can’t be done by everyone, then I realized, not everyone has the same talent or gift to fix things. I don’t have to be a geek to know how to open, unlock or fix my phone, neither do I have to be a geek to understand basic technical tricks fixing things. Today, I will reveal to you how i converted a 6000mAh Powerbank to 16000mAh, check out the DIY tips below.
This doesn’t require much in-depth understanding of electrical and electronic, if you had fixed any gadget before, I can assure you, the process you’re about to see will only require basic knowledge and idea. Learn more about battery connections here.
Warning!!! If you have no prior knowledge about batteries, please do not do this!!! However, if you insist, any damaged, explosion, electric shock, fire outbreak or other unfavorable condition caused by doing this should not be linked or associated to this blog.
How I Converted A 6000mAh Powerbank To 16000mAh Battery Capacity
Now let’s go, I’ll take each step in a very simplified manner, am not an electrician so don’t expect too many technical words, I will use simple and general language you’d understand. Let’s slowly see all the steps I took to transform a low capacity powerbank to a monster.
Requirements
- Powerbank 1 (6,000mAh) [PB 1]
- Powerbank 2 (10,000mAh) [PB 2]
- Soldering iron & Solder
- Screw driver
- Android phone & USB cable
- A small piece of wire
- Black tape
- Electricity or Generator
- Knife
Specs & Features of Powerbank 1 & 2
- Power bank 1: is a Oraimo branded powerbank with Capacity: 6000mAh Input: 5V/1A, Output: 5V/2A, Recharge type: adapter or USB cable, still in perfect working condition, barely 5 months old.
- Powerbank 2: is an Innjoo branded powerbank with Capacity: 10000mAh, Input: 5V/1A, Output: 5V/2A, Recharge type: adapter or USB cable, It’s not in perfect working condition (charges but can’t be charged), had charging port problem; this means, I’ll have to twist and twist the cable before it will start charging, chances are 50/50. I’ve been managing it that way until I couldn’t bear it anymore, and It’s almost a year old.
Follow stepped DIY guide below..
Step 1
First thing I did was to slowly and carefully open powerbank 2 using the required screw drivers and knife, ensure you’re using the exact screw driver for that screw size, anything bigger or smaller would damage the head.
Step 2
I plugged my soldering iron to electricity and proceeded to step 3 while I wait for it to get hot. I had to be careful because of its flammability.
Tip: Place it on a surface that can’t be affected by heat, neither should you place it on a surface that will conduct heat. Perfect surface to place the soldering iron; bare floor, ceramic tiles etc.
Warning: Don’t leave the soldering iron where you have little children, keep close watch and always disconnect when not in use. Place in a ventilated region to cool off when after final usage. While working, be careful not to allow the heated metal rod touch your skin.
Step 3

While waiting for soldering iron to heat up, i pulled out the battery inside PB 2 immediately after opening the PB, then disconnected it from the panel, using the heated soldering iron.

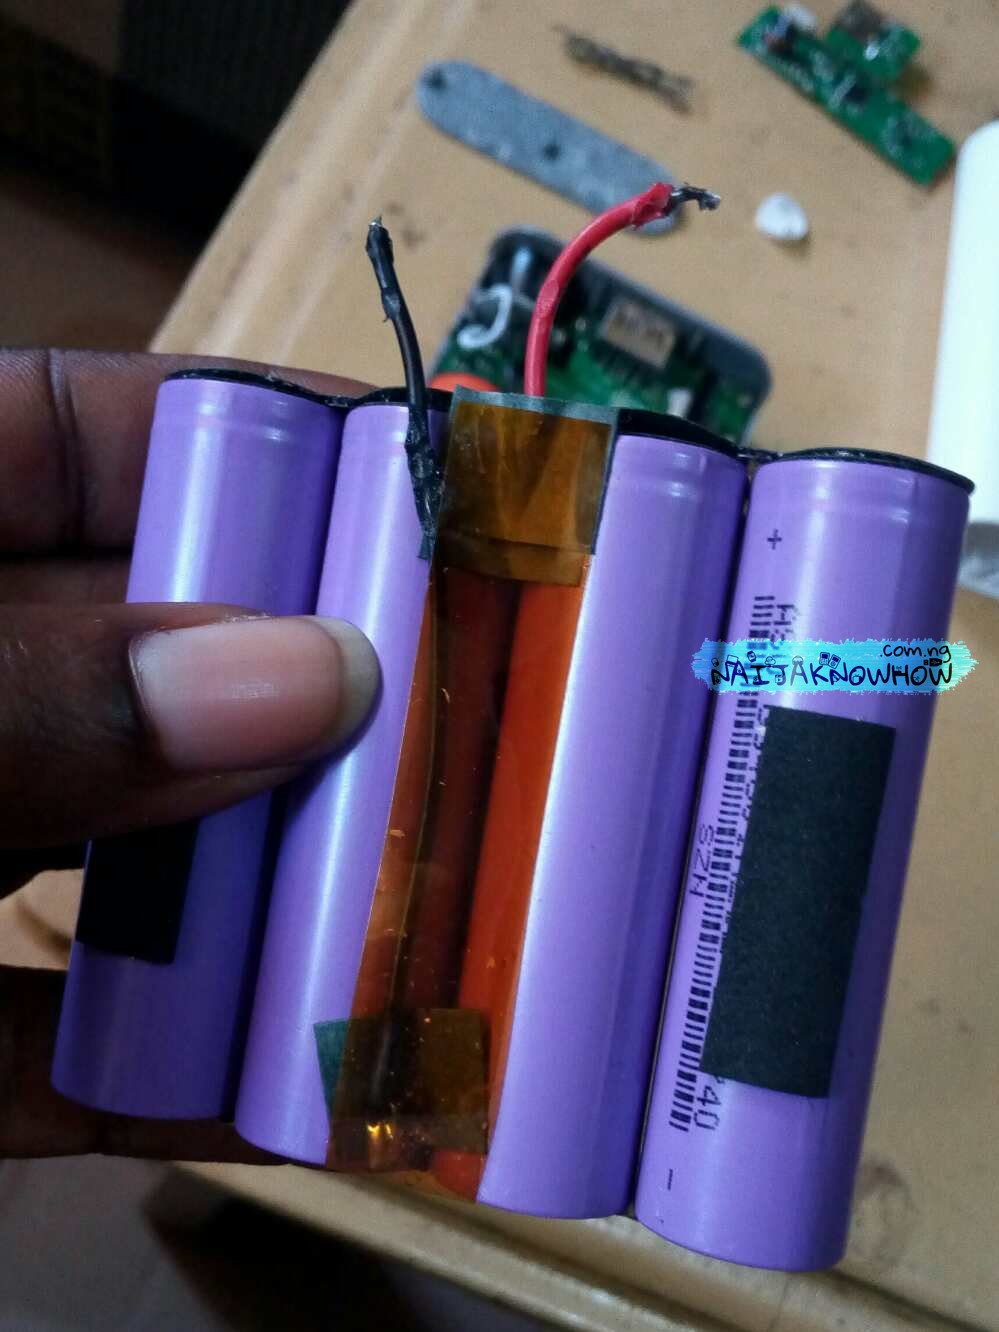
I melted the solder used in joining the positive and negative wires to the panel, leaving me with a Powerbank without panel, all I needed was its 4 cells 2500mAh batteries connected in a P4 parallel connection.
Step 4

I opened Powerbank 1 (PB 1), just like I did to PB 2, I realized they aren’t coupled similarly. Be slow while opening different powerbanks across different brands. After opening, I pulled out the battery cells carefully without disconnecting the positive and negative wires from the panel.
Tip 2: Don’t ever force open your powerbank, different powerbank has different way of opening. So, if you aren’t getting it, don’t force it. Go online, search for how to open that model of Powerbank.
Step 5

Afterwards, I took my little piece of wire, then joined the wire’s + & – (positive and negative) to PB 1 battery’s + & -. (See how I joined the wire in the picture below)

Note: The batteries of the Powerbanks are usually connected in parallel. Parallel connection will ensure Powerbank is in good working condition, even when one or more battery cells fail/damage, bad cells only reduces battery capacity, whereas, voltage remains the same.
Step 6

I created a little hole at the top of PB 1, so that the wire can be passed out through it. How was the hole created? I used the soldering iron to melt a hole on the plastic material.

Step 7

The wire was then connected to PB 2 to complete the battery parallel connection sequence. It was connected in P7 parallel connection (See fig 1)

Step 8

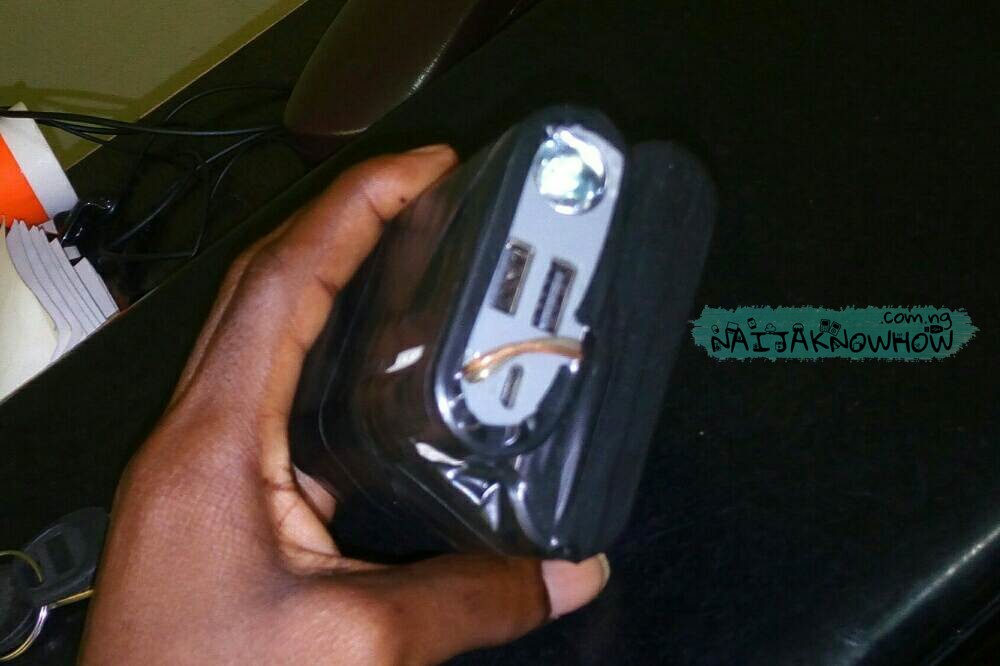
I coupled both powerbanks, sellotaped it as seen in the picture below, then tested to know how it will react to charging and being charged.

Testing:

It fully charged my Infinix Note 2 (4000mAh battery capacity) losing just one single charge bar. Full charging the conjoined Powerbanks with 2/4 power bar took more than 6 hours. (not used it up yet)
We’ve come to the end of the stepped DIY guide, that was how i converted 6,000mAh Powerbank to 16,000mAh Powerbank. If you want to know how perfect it’s been, I can assure you, it’s working fine! I didn’t regret my action.
To sum it all up:
Converting my Powerbank from 6000mAh to 16000mAh wasn’t much of an ado, this was because I understood the process of battery connection and was able to accomplish this task. I had to find a good use for PB 2 that wasn’t charging but in perfect condition, the batteries however, were still intact. If you ever want to try this, you can, without having to purchase another Powerbank, all you need do is, purchase new battery cells matching the exact one in your existing PB, then follow the steps of connecting them in parallel. I hope this article was insightful, PLEASE TAKE CAUTION, BATTERIES EXPLODE!!!
If you read finish …shaaaa don’t turn your Powerbank to PowerBomb, aaayyammmm not there o!


